9 Creative Ways to Tell a Story Through Photography Composition
Have you been experimenting with your photography for a while and nailed most of its technical aspects, but still feel it lacks a certain depth?
What if you could learn how to create photos that make more impact on viewers and even stir strong emotions in them? There are numerous ways and techniques that can help you gain a fresh perspective on your photography and take your skills to a whole new level. A lot of them are based upon the rules of composition.
But what is composition?
To begin with, it is a certain way you arrange all of your photograph’s elements within its frame to make it aesthetically pleasing and guide the viewer’s eye around the space of the image. However, it is so much more than just that. By using the space of your photograph thoughtfully and creatively, you can tell a compelling story and convey an array of emotions to a person looking at it.
Most of the techniques are so universal and fundamental that can be used not only in photography, but also in illustration, art, or design. Below, we will have an in-depth look at specific tips and tricks that never fail to work.
1. Negative Space and Calm
Negative space in a photograph is everything that surrounds its main subject (which is, unsurprisingly, called positive space). The most basic reason for using it is to isolate the subject and draw our full attention to it by stripping the surrounding space of any distractions. As a result, the picture with cluttered and stuffy background might be transformed into a clean space with enough air for its subject to breathe.
But there is still more to it.
Imagine a vast stretch of blue sky over sea waters on a quiet summer day, waves barely splashing, and a single boat – immovable, tiny, rocking. The moment is filled with calm and serenity. You can go darker and show a small figure of a man, surrounded by milky fog that spreads over the entirety of your picture, nearly engulfing the scenery and the man himself. This picture is talking more of loneliness rather than peace and quiet. By changing the lighting or the context just a bit, you can experiment with a whole array of these related but at the same time different emotions to create your own narrative.
TIPS:
The playground for experimentation is huge: you can look for an unobstructed stretch of the sky and shoot your object against it, find an interesting detail on an otherwise empty wall, use a flash, or a -1 or -2 exposure compensation setting on your camera to darken the background; or you can simply decrease the depth of field to get rid of unnecessary distractions.
The negative space doesn’t have to be empty (in fact, it may be filled with textures, patterns or color), but should stay clean and simple nonetheless.
There has to be enough of it. A rule of thumb is that there should be twice as much of negative space in an image as compared to the positive space. The good thing is, it’s a perfect situation for breaking rules, including the classic rules of composition. Put your subject in the corner of an image with 5 times as much of the negative space around it and see what happens.


2. Silhouettes and Drama
To make a silhouette out of your subject, you only need to capture it against a bright background, like the sky, a lit doorway or a window. Because of that, the subject gets blacked-out, loses its details and features, retaining only the outline. With so much being hidden, the viewer’s imagination sets in motion and longs to create a story.
Simple shapes, a bigger focus on the position and the action of the subject, a greater role of lighting and background make the situation feel almost theatrical. The light surrounding the objects heavily impacts the mood of the scene: warm colors make it cozy and romantic, while a cooler background may send shivers down our back.
TIPS:
· Choose a recognizable, distinct shape of the silhouette, in order to tell a clearer story and make a bigger impact on the viewer.
· The light must come from behind of the subject, so turn off your flash! The easiest light conditions for capturing silhouettes are during sunrise and sunset.
· To get the correct exposure, meter off the background, instead of your subject. At the same time, shoot with a small aperture to increase the depth of field and catch everything nicely in focus.


3. Patterns, Repetition and Rhythm
There is a sense of familiarity in patterns. Life is filled with them – just take a closer look at flowers, seashells, or a lake covered with ripples. Repetition is also natural: it’s in a heartbeat, a song, a field of flowers. And what is familiar is usually comfortable to look at.
Patterns and repetitions help organize the space and create order amidst chaos (which is our life). Like in music, they make your photo pulse with rhythm, and your eye dance from a point to point around the entire space within its frame. Such rhythm adds life and strength to a picture. The image may become almost palpable, when a pattern takes the form of a clearly defined texture.
TIPS:
Patterns and repetitions are so common around us that you never have to look hard to find them. Trees and plants, lines or crowds of people, rows of columns or lampposts, bricks on a wall – the opportunities are plentiful.
Try close-up photography and open up a whole new universe of patterns.
Break a pattern, if it gets so comfortable to look at the photograph it puts you to sleep. Sneak one red apple into a stall of green ones, capture rows and rows of dark silent windows with a single one that is warmly lit up. A small fix – and it isn’t so boring anymore.


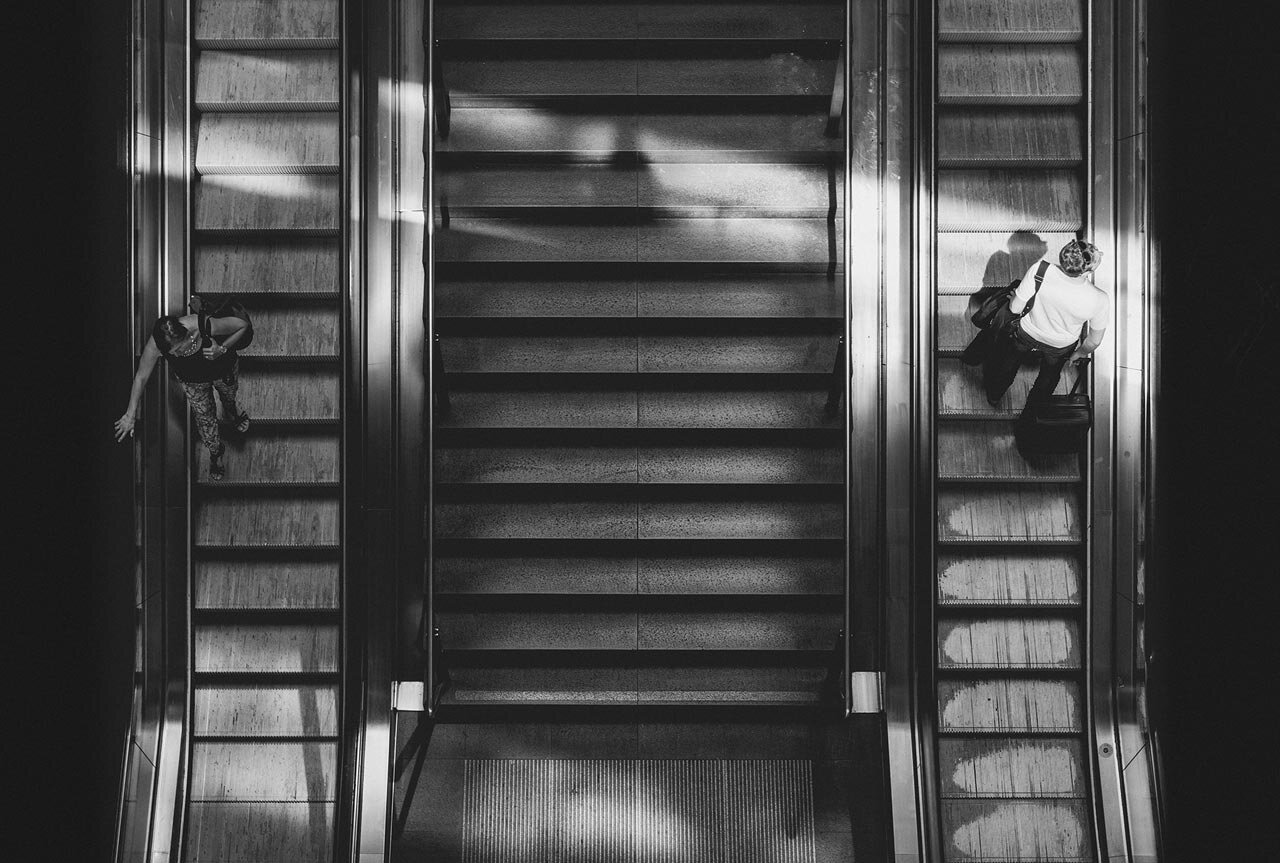
4. Perspective and Wonder
An unusual perspective is yet another cure against boredom in a photograph. We’re definitely used to seeing things at an eye-level, even more so when taking pictures. How about changing that and trying to look at the world from a perspective of a bug, or a bird? Seeing things in a new way puts us on a path of discovery and fills with a sense of wonder.
By keeping your camera close to the ground you can considerably increase the scale of things you capture in your photography, making a forest out of grass and mountains out of buildings. Shooting from a high vantage point, we can throw a glance over sweeping landscapes and big cities, with people down there seeming small and insignificant.
TIPS:
Try pointing your camera straight up into the sky or straight down to the ground. Removing the horizon from the frame of a picture slightly disorients the viewer, making their eye linger on the picture a bit more. You may even surprise yourself by discovering unusual patterns, shapes and compositions while you are at it.
Place your camera close to a puddle of water on the street after a rainy day. You can capture some great reflections that way!
Don’t lie on the ground with your camera when shooting from a low angle, just use a flip-out LCD screen instead of the viewfinder (if you have one).


5. Symmetry and Harmony
We create symmetry by mirroring the opposing parts of an image – left and right, up and down, or diagonals. Why do we think of symmetry as appealing and pretty to look at? We do like seeing it in faces, nature, or interior. At the same time, asymmetry annoys us and creates an urge to rearrange things the “correct” way.
The key words are balance and harmony. When an image is well-balanced it is perceived as healthy (when talking about living organisms and nature) and perfect. Nothing is begging to be changed and the eye is resting comfortably.
TIPS:
Reflections in lakes, rivers, and other bodies of water serve as great sources of inspiration for horizontal symmetry. The so-called vertical symmetry may be achieved by photographing buildings, columns, windows, or roads. There is still another type – the radial symmetry – found in photographing domes, water ripples, succulent plants, flowers. There is no shortage of ways to make symmetrical images, and keep them from being identical.
Make sure the line of the symmetry is perfectly aligned and centered. For example, if you are shooting a symmetrical building, be sure to position yourself exactly in the middle and keep the camera perpendicular to the face of the building to avoid distortion.


6. Lines and Dynamic
Let’s talk about the most basic compositional elements that can be found in almost every photograph – lines. We have all seen them and know what they are, but what do they have to do with dynamic? By dynamic, we mean energy, movement, life, a sort of directed force. As we will soon see, a lot depends on a line’s orientation.
A horizontal line is flat. It’s stable and solid, since you can’t tip over what is already “lying on the ground”.
What about a vertical line? It’s on the second place in our top chart of lines in terms of instability. If you kick something standing vertically, it may very well fall. Less stability leads to more energy and vertical position means more strength. Imagine a building standing tall and proud, a tree rising high, or a row of sturdy columns. There is power, reach and a potential for growth in them.
Now, a diagonal line is the most unstable, since we can see it as already “falling down”. Filled with directed force and energy, such a line is a perfect guide for movement within a photo. A diagonal line successfully leads the eye in whatever direction you want it to: away from the viewer and deeper into the picture, toward the viewer, or to the photograph’s subject.
TIPS:
Use a grid overlay and a built-in level for your viewfinder to align the lines perfectly the way you want them.
Look for shadows around you, they often make strong leading lines and add drama to the scene.
Create your own lines, for example, by leaving footprints in the snow or the sand, lining up objects or changing your perspective.


7. Shadows and Mystery
We pay a great deal of attention to light while shooting photographs. At the same time, deep shadows are often disregarded or even avoided. But in fact, the interplay of light and shadow, the presence of dark areas or figures in an image can be of significant help in telling a memorable story through a photograph.
Visually, shadows can add contrast to a picture and make it more graphic. From a storytelling perspective, shadows cast from an object often take form of quirky silhouettes, shapes and lines that appear where there was nothing before, thus making an image slightly surreal. The shadowed areas lack details, leaving much to the viewer’s imagination and adding up to the atmosphere of mystery and intrigue.
Another thing that shadows can do is reveal texture and add more definition to shapes and surfaces. You may have noticed that when the sun is low, the shadows get longer and softer, making textures – like those of the hills, rocks or sand dunes – more pronounced, eliminating flatness and adding depth to the scene.
TIPS:
While typically avoided by photographers in other situations, shooting in harsh light results in photos with deeply dark, dramatic shadows that contrast greatly with the brightly sun-lit areas.
Try converting your photos to black and white, to make the most of the high contrast and deep shadows.
Look for shadow patterns on the walls or the ground – it’s a great opportunity to make an abstract photo!


8. Depth of Field and Intimacy
A shallow depth of field means only one part of your photo – the main subject – is in focus while the background is out of focus, blurry and soft. By doing that you concentrate all your attention on the subject, isolating it from everything else, getting closer and more connected to it. The viewer is one-on-one with the subject and has enough time and space to get to know it and dwell on all the tiny details. This atmosphere of intimacy and timelessness can transform into an almost magical scene with the help of rich colors of the background and light effects (such as backlight or bokeh).
TIPS:
Try shooting the same subject with different apertures (for example, one at a f-stop of 1.2, one at f/1.8, and one at f/2.0) to make sure your focus is where you want it to be.
A wide aperture lets more light in, which makes the shallow depth of field perfect for experimenting with low-light conditions.
Avoid shooting with a wide-angle lens, which is more suited for a deep depth of field (where the whole scene from the foreground to the background is sharp and in-focus).


9. Dutch Angle and Suspense
If you tilt your camera while shooting, thus intentionally skewing the horizon of the photo, you are using the so-called Dutch camera angle. The name doesn’t have anything to do with the Netherlands, and is rather a misspelled version of the “Deutsch angle”, or the German angle, a term made up based on a camera angle extensively used in the German expressionist movies of the 1920s.
It has another, more badass name – the Batman angle – due to its frequent exploitation in the 60s’ TV series Batman. With it being a well-favored technique in cinematography, we can say with certainty it will give your photos a more cinematic look.
The most common use of this technique is to create psychological uneasiness, a sense of disorientation and fear in an image. A simple tilting of the camera can make a plain boring alley look dark, dirty and full of secrets; or a straight path of a man into a crooked one, full of dangers and nasty surprises. That’s why it’s often used in street photography, where it is sometimes needed to create a moody or tense atmosphere.
TIPS:
It’s important to have a goal in mind, when using the Dutch angle, so that there is no doubt it is intentional. For that same reason it shouldn’t be too subtle, otherwise it will simply look like a mistake.
Using this camera angle helps if you’re shooting in a tight spot – there is much more of what you can squeeze into the frame, while tilting your camera.


These are just some of the many guidelines you can use to make your photography convincing and memorable. From here, you could go further and explore color, light, shapes or different artistic styles. Additionally, I can wholeheartedly recommend to look for sources of inspiration everywhere you can – be it other photographers’ works, art, cinematography and other visual arts, or just the world around you.
In the end, being passionate about what you do is what matters the most.
Create your own stories, be aware of your emotions and trust your vision. Follow the rules or break them, but more importantly, keep experimenting and learning new things!
Anna Udalova
https://www.instagram.com/annaudalova